OpenAPI/Swagger Monitoring
OpenAPI and Swagger help users design and document APIs in a way that is readable from both humans and machines. As a consequence, they can also be used to generate the code that will run the specified API - both on the provider and consumer side. Can we leverage this same principle to simplify API monitoring? After a brief first look at OpenAPI and Swagger, this article will show how we can quickly use them to monitor a new or existing API.
The OpenAPI Specification
The OpenAPI Specification (OAS) specifies a standard, language-agnostic and machine-readable format to describe a web API in one or more files. Nowadays, it acts as a vendor-neutral standard for describing the structure and behaviour of HTTP-based APIs, and exists as part of the OpenAPI Initiative (OAI).
Following the OAS brings the following advantages:
- A description of the API that is readable from both humans and machines.
- The possibility of automatically generating documentation, implementation logic and even mock servers for testing.
- Early validation of the data flows happening within the API.
For those new to the OAS and wanting to get a basic understanding without diving straight into the specification itself, the official OpenAPI Specification Explained guide is a great place to start.
Swagger vs OpenAPI
The OpenAPI Specification is the newer, fully open source-driven incarnation of the Swagger Specification maintained by SmartBear Software. The spec describes, produces, consumes, and visualizes RESTful application and web services.
The name Swagger today indicates a set of tools, both free and paid, that support users of the OpenAPI ecosystem.
Exploring the specification
The core of our API specification will happen in the OpenAPI root document, normally named openapi.json or openapi.yml. We can choose between JSON and YAML formats as we like.
The bare minimum we need to declare is the OpenAPI version, the basic information about our API, and finally the available endpoints.
openapi: 3.0.0
info:
  title: OpenAPI document for our new Payment API
  version: 0.0.1
paths: {} # Nothing here yet
An API without endpoints is not very useful. We can add our first, together with a GET operation:
openapi: 3.0.0
info:
  title: OpenAPI document for our new Payment API
  version: 0.0.2
paths:
  # User account balance
  /balance/{id}:
    # Retrieve the user's balance on the given account
    get:
      ...
The next step is to define what the operation will look like. In this case, we will specify some constraints on the id parameter, as well as the response.
openapi: 3.0.0
info:
  title: OpenAPI document for our new Payment API
  version: 0.0.3
paths:
  # User account balance
  /balance/{id}:
    # Retrieve the user's balance on the given account
    get:
      summary: Get the user's account balance
      description: Retrieves the current account balance for the given user.
      operationId: get-balance
      parameters:
      - name: id
        in: path
        required: true
        schema:
          type: string
          format: uuid
      responses:
        "200":
          description: "OK"
          content:
            application/json:
              schema:
                $ref: "#/components/schemas/balance"
Notice we are explicitly defining which schemas the parameter and response should conform to. In the case of our response, we are referring to an externally defined schema. This is helpful when we need to reuse a schema definition multiple times across our spec file.
As we proceed, we might add multiple endpoints, each with one or more operations.
openapi: 3.0.0
info:
  title: OpenAPI document for our new Payment API
  version: 0.0.4
paths:
  # User account balance
  /balance/{id}:
    # Retrieve the user's balance on the given account
    get:
      summary: Get the user's account balance
      ...
  /transactions:
    get:
      summary: Retrieve transaction
      ...
    post:
      summary: Submit transaction
      ...
  ...
We can keep on building out our API spec as needed. The more precisely we describe our API in this file, the more useful this specification will become, whether we use it for documentation or code generation purposes.
Generating documentation from OpenAPI
Let’s now take a look at a more complex, finished example: the Swagger PetStore demo. Even if we had written it ourselves, this description of a complete API could be overwhelming if we just tried to parse the file line by line. To first-time users, that could feel even more daunting. A better option would be to use the open-source toolset Swagger offers to generate human-readable, interactive API documentation from the file we already have.
Pasting the content of the spec file to Swagger Editor will produce a preview of our Swagger UI documentation. This is helpful for consumers of the API, who will be presented with an orderly documentation page breaking down each endpoint while also allowing users to test out different operations.
Generating boilerplate code from OpenAPI
When writing a new API, we will oftentimes need to produce a certain amount of boilerplate code for both our provider (e.g. a server exposing our API for consumption) and consumer (e.g. an SDK for our API) applications. Once we have our OpenAPI file in place, we can use Swagger Codegen (also available within Swagger Editor) to automatically generate that code for us, saving us precious time and reducing the avenues for human error.
The following snippet is an example of the code Swagger Codegen can generate starting from an OAS file.
/**
   * Invokes the REST service using the supplied settings and parameters.
   * @param {String} path The base URL to invoke.
   * @param {String} httpMethod The HTTP method to use.
   * @param {Object.<String, String>} pathParams A map of path parameters and their values.
   * @param {Object.<String, Object>} queryParams A map of query parameters and their values.
   * @param {Object.<String, Object>} collectionQueryParams A map of collection query parameters and their values.
   * @param {Object.<String, Object>} headerParams A map of header parameters and their values.
   * @param {Object.<String, Object>} formParams A map of form parameters and their values.
   * @param {Object} bodyParam The value to pass as the request body.
   * @param {Array.<String>} authNames An array of authentication type names.
   * @param {Array.<String>} contentTypes An array of request MIME types.
   * @param {Array.<String>} accepts An array of acceptable response MIME types.
   * @param {(String|Array|ObjectFunction)} returnType The required type to return; can be a string for simple types or the
   * constructor for a complex type.
   * @param {module:ApiClient~callApiCallback} callback The callback function.
   * @returns {Object} The SuperAgent request object.
   */
  exports.prototype.callApi = function callApi(path, httpMethod, pathParams,
      queryParams, collectionQueryParams, headerParams, formParams, bodyParam, authNames, contentTypes, accepts,
      returnType, callback) {

    var _this = this;
    var url = this.buildUrl(path, pathParams);
    var request = superagent(httpMethod, url);

    // apply authentications
    this.applyAuthToRequest(request, authNames);

    // set collection query parameters
    for (var key in collectionQueryParams) {
      if (collectionQueryParams.hasOwnProperty(key)) {
        var param = collectionQueryParams[key];
        if (param.collectionFormat === 'csv') {
          // SuperAgent normally percent-encodes all reserved characters in a query parameter. However,
          // commas are used as delimiters for the 'csv' collectionFormat so they must not be encoded. We
          // must therefore construct and encode 'csv' collection query parameters manually.
          if (param.value != null) {
            var value = param.value.map(this.paramToString).map(encodeURIComponent).join(',');
            request.query(encodeURIComponent(key) + "=" + value);
          }
        } else {
          // All other collection query parameters should be treated as ordinary query parameters.
          queryParams[key] = this.buildCollectionParam(param.value, param.collectionFormat);
        }
      }
    }

    // set query parameters
    if (httpMethod.toUpperCase() === 'GET' && this.cache === false) {
        queryParams['_'] = new Date().getTime();
    }
    request.query(this.normalizeParams(queryParams));

  ...
Depending on how much is described in a given API spec, it is possible to move even further and generate tests, mock servers and more. See openapi.tools for an up-to-date list of tools belonging to the OpenAPI ecosystem.
Generated monitoring checks with Checkly
API monitoring is key to ensure that our endpoints are returning the correct results in an acceptable timeframe. If we can generate APIs from a OAS description file, we can also generate monitoring checks for them. Checkly is a member of the OpenAPI initiative, and allows us to import an OpenAPI spec file and automatically creates one or more checks depending on the amount of information available. All it takes is a couple of clicks.
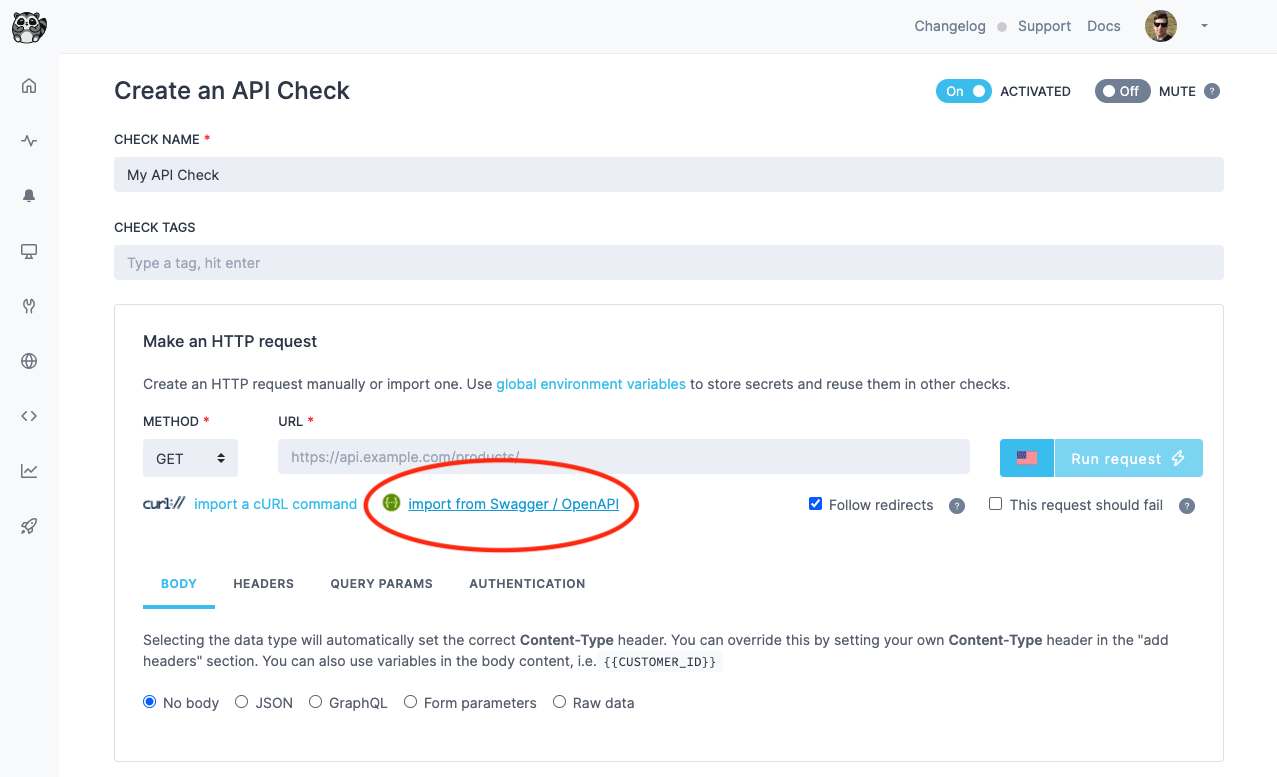
When creating an API check, select the import from Swagger / OpenAPI button.
That will bring up the import dialog. This is where we give Checkly the URL to the Swagger/OpenAPI specification file.

Before anything is created on our behalf, Checkly will show us a summary of all the checks that will be imported. We can choose to import them all defined checks or just a subset.
Notice that we can also select whether to import headers, query params and other settings or just to ignore them for now.
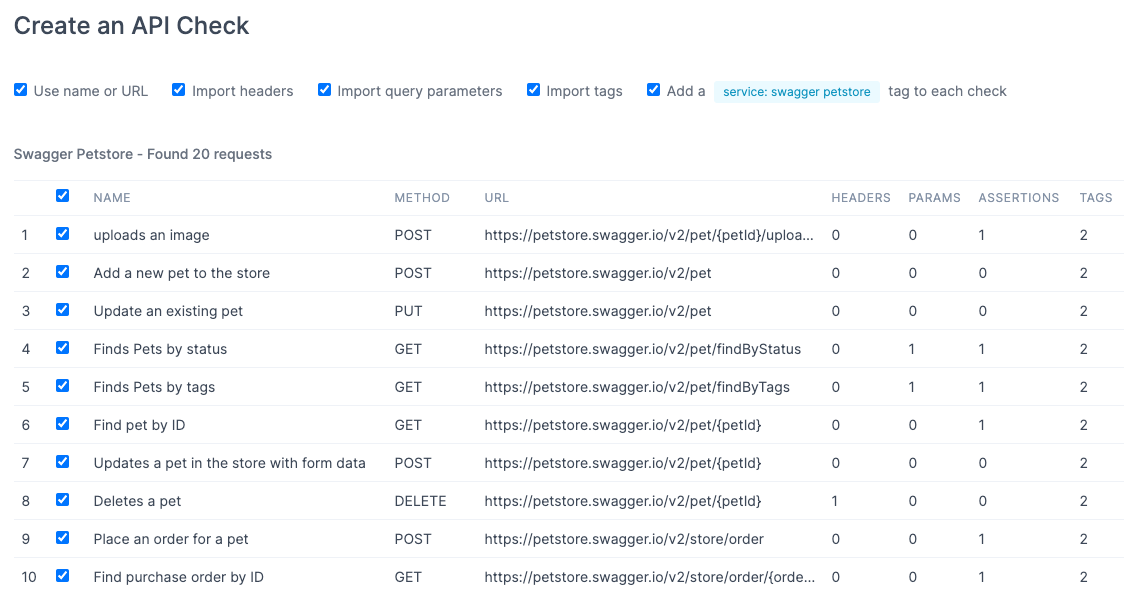
Once we confirm, the checks will be created for us and will start running according to the schedule we have selected.
Based on how comprehensively the file we imported described the API we want to monitor, we might have to tweak certain checks manually before they are fully set up.
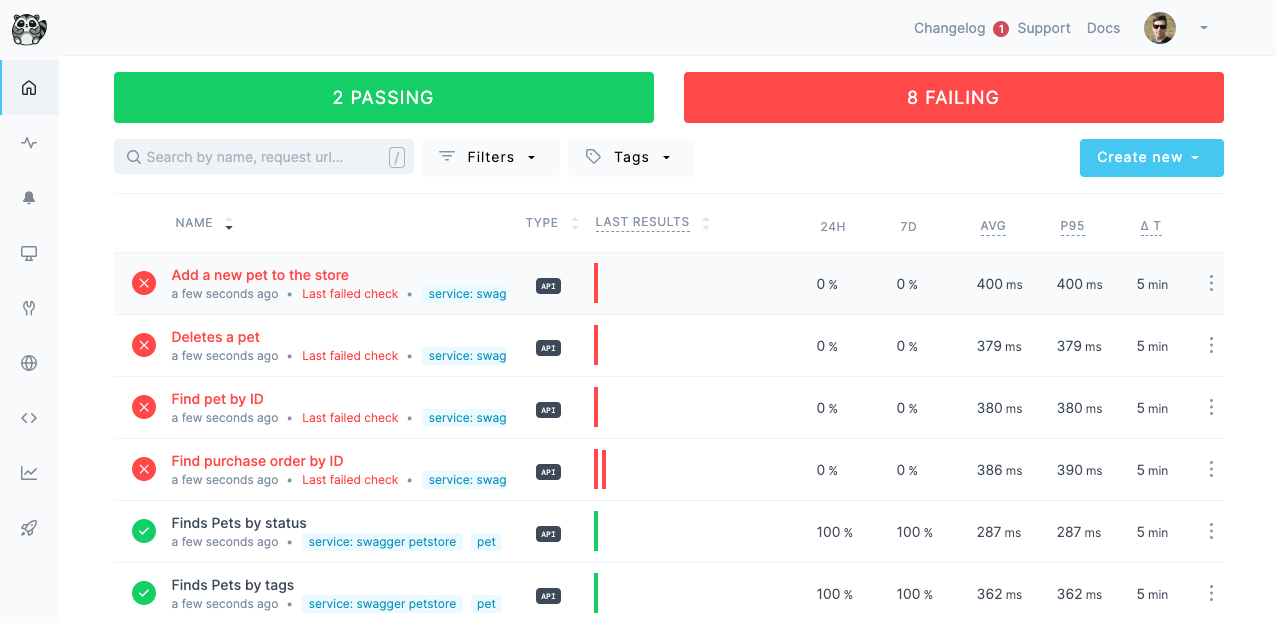
This usually includes adding missing headers or body contents that might not have been explicitly defined in the imported file.
We can open the newly created checks and change any of their settings.
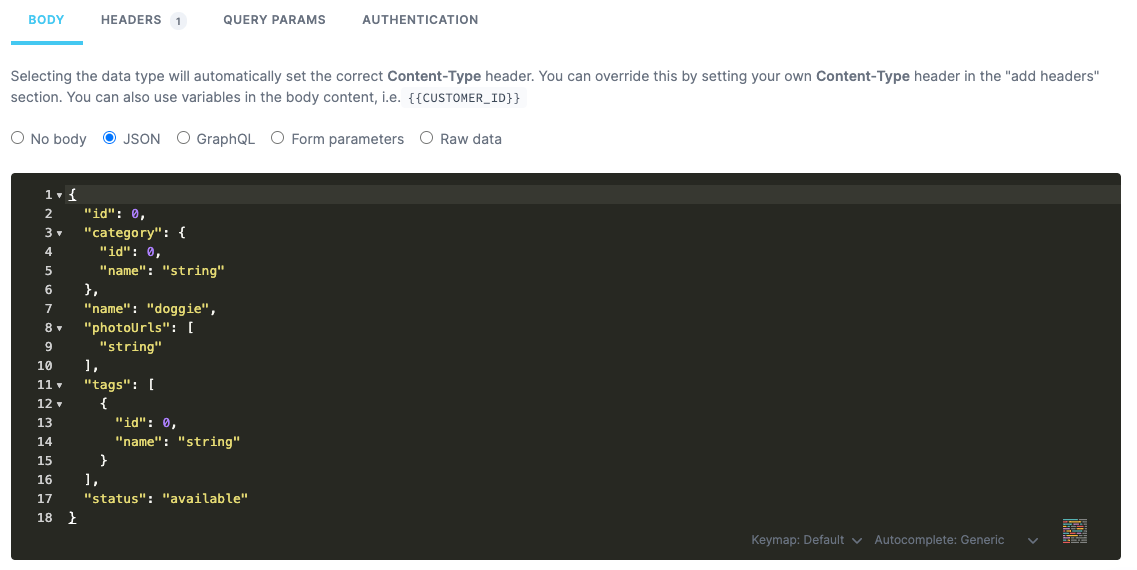
After a small amount of tinkering, or none at all, we should have all our checks up and running.
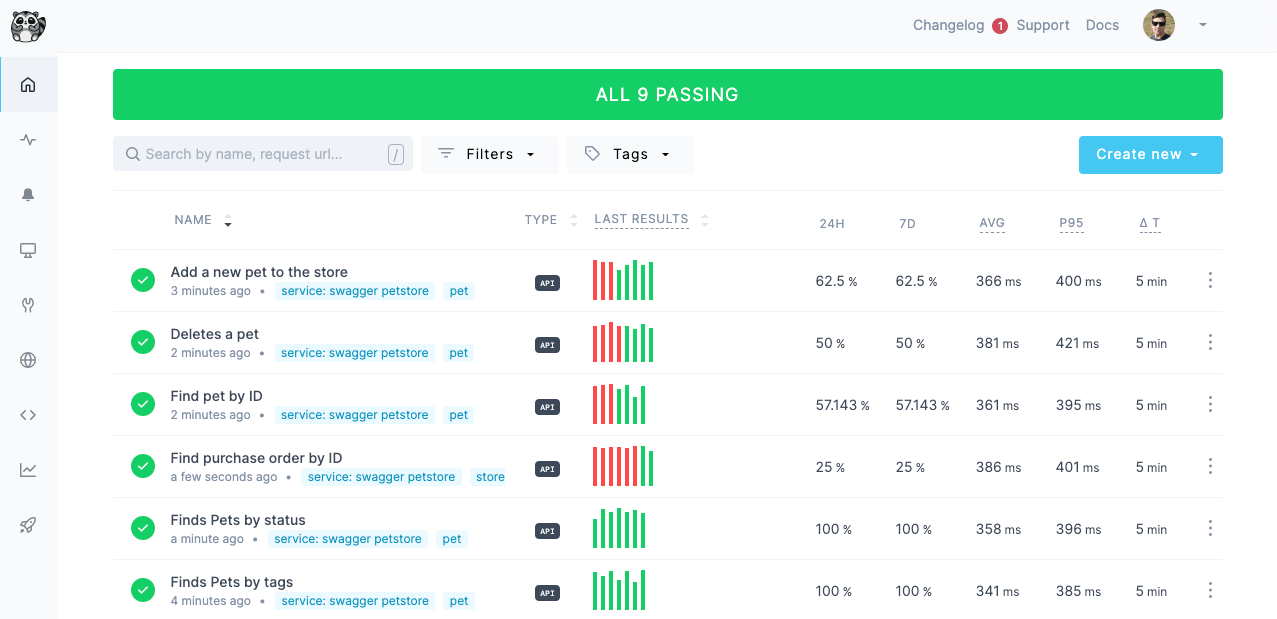
For APIs medium and large, and for any that is already described with an OAS file, this check-generating procedure can:
- Save us a large amount of time otherwise spent in manual check setup.
- Reduce the chance for human error in check configuration.
- Help us ensure the right checks are set up according to our single source of truth.
Higher check coverage can ultimately give us higher confidence that our API is working as expected, and basing our monitoring on our OpenAPI specification enables us to get to higher coverage faster - without losing flexibility when building our checks.
Building on our generated monitors
As we look to increase our endpoint coverage across our APIs, we might want to explore the following resources:
- Learning more about API monitoring basics and best practices.
- Defining our API checks as code to scale our setup.
- Integrating our API monitoring with E2E monitoring for our websites.
Read More
Start monitoring your API endpoints and your vital site transactions.
Start for free